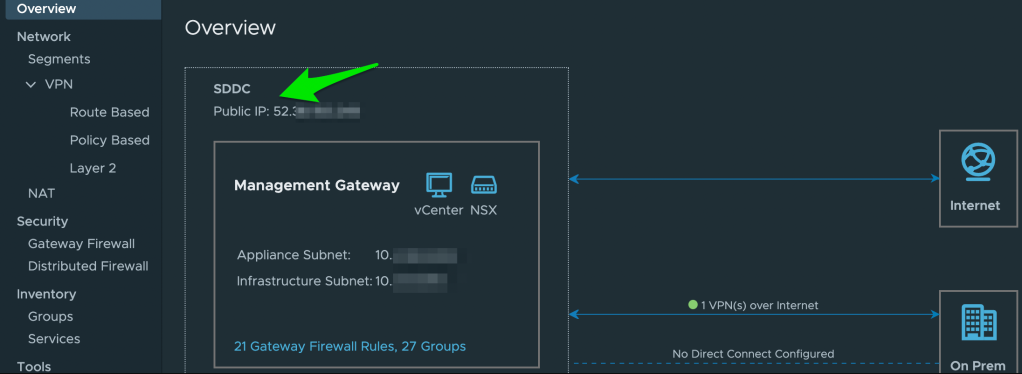
This is part two of my blog on how to leverage Microsoft Active Directory as an Identity Source and have AD replicate between two VMware Cloud on AWS SDDCs. Now that I have Active Directory running in US East, I will setup a route based VPN between my US East SDDC and US West SDDC. For my lab, I am using a Route Based VPN to replicate Active Directory Traffic. To add Route Based VPNs to both SDDCs, take note of your SDDC Public IPs on your Management Networks, determine what you want your Autonomous System Numbers (ASN) to be, and determine your IPs for both BGP local IPs. To keep the BGP IP scheme simple, I chose 169.254.x.x/30 to only allow for two available IP addresses. FYI, There are two different number ranges for Public and Private ASN numbers. Public is 1-64,511 and Private is 64,512-65,535. Route based VPN makes things simple in this scenario since we are leveraging Border Gateway Protocol (BGP) where both SDDCs are able to exchange routes and leverage BGP peering. For a deeper dive into BGP peering specifically around AWS Direct Connect and VMware Cloud on AWS, check out Nico Vibert’s Blog. It will not disappoint!
Once you have the ASN and SDDC Public IP information, you can add your route based VPN by going to Networking & Security tab -> Network -> VPN -> Route Based -> “Add VPN”. For my lab, I have kept all the defaults for the tunnel and IKE settings. You may need to make changes here based on your security requirements. You must, however, select a pre shared key that will be used for both VPN connections to establish a secure connection. I have also left the Remote Private IP field blank. Once you click “Save”, you will see the status of the VPN and BGP Remote IP go to a yellow status as the negotiations take place. If successful, you should see both Remote BGP IP and VPN status turn green.

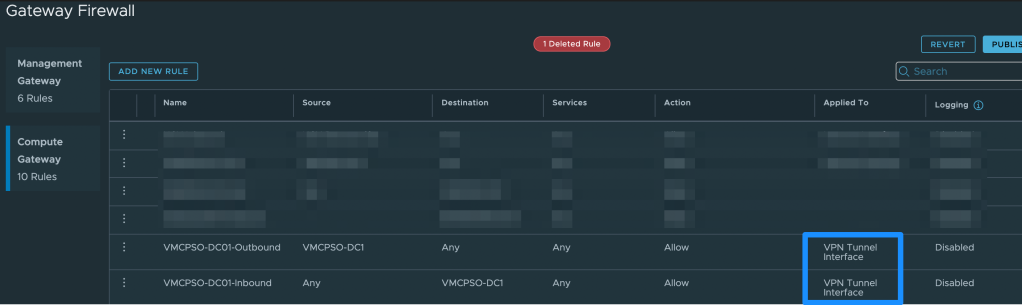
The next step in the process is to deploy a second Domain controller inside the second SDDC. Before you can promote the second DC, you need to first deploy a Windows Server VM in SDDC #2. Once the VM is deployed, you will then need to establish two-way communication across the VPN tunnel to be able to add the Windows Server to the domain and promote it. Although the VPN is up, you still need to configure additional Gateway Firewall rules in order for Domain Controllers to talk to each other across networks. Go back to Networking & Security -> Security -> Gateway Firewall -> Compute Gateway -> Add New Rule. For two-way communication, add two rules that allow traffic to and from the Domain Controller. Make sure that you have this traffic go over the VPN Tunnel Interface and NOT the Internet Interface. Make these rules for both SDDCs.
Before promoting your soon-to-be Domain Controller, make sure you can ping across the VPN via IP and DNS FQDN. The next step in the process is to deploy a second Domain Controller inside SDDC #2. I will not go through the process in this blog but the steps are similar to setting up the first DC in that you need to promote the server to a Domain Controller. There are several blogs out there on how to do this but here’s one just in case. Once added, you can verify Active Directory is syncing across SDDCs and Domain Controllers by running “repadmin /replsummary” via the Command Prompt. You can now add users, GPOs, etc to either side and both SDDCs will have the same info. To take things even further, add your new Domain Controller as an identity source to the new SDDC. This will allow users to login to either vCenter as long as they have an account on the domain. If you missed my blog on setting up AD as an identity source with VMWonAWS, click here.
